KlipLoft Help
Requires macOS 26 or later, on a Mac with Apple silicon
Open KlipLoft
KlipLoft runs quietly in the menu bar and remembers everything you copy: text, links, images, files and colors. To see your history, press ⇧⌘V in any app, or click the clipboard icon in the menu bar and choose Open KlipLoft.

Each card shows:
- A header with the clip type (or a name you gave it), how long ago you copied it, and the icon of the app it came from.
- The content: the text itself, a picture, a link with its page title, a file's thumbnail, or a color swatch.
- A footer with details such as the number of characters or the image size, and its quick-paste shortcut (⌘1 to ⌘9).
Press Esc or click anywhere outside the panel to close it.
Paste a clip
- Open KlipLoft in the app you want to paste into.
- Use ← and → to pick a clip, or click it.
- Press ↩ or double-click. KlipLoft closes and pastes the clip where your cursor was.
Paste as plain text. Press ⇧↩ to drop fonts, colors and links from rich text. To always paste plain text, turn on Always paste as plain text in Settings.
Quick-paste. The first nine clips have numbers. Press ⌘1 to ⌘9 to paste one without moving the selection (add ⇧ for plain text).
Using a clip again moves it back to the front of your history. To just copy a clip without pasting, select it and press ⌘C.
Search and filter
With KlipLoft open, just start typing. KlipLoft searches the text of your clips, their names, link titles, keywords and the apps they came from, and shows only the matches.

To narrow results by kind, click the filter button at the right of the search bar and choose a clip type (Text, Link, Image, File or Color) or a source app. Each filter appears as a chip in the search bar.

Press ⌫ in an empty search bar to remove the last chip, and Esc to clear the search.
Pinboards
Pinboards keep the clips you use again and again (addresses, replies, code snippets, brand colors) in colored tabs. Pinned clips are never removed from your history, however long you've set it to keep things.

- Create a pinboard: click + next to the tabs.
- Pin a clip: right-click it, choose Pin to, then pick a pinboard (or New Pinboard).
- Switch pinboards: click a tab, or press ⇥ and ⇧⇥. Clipboard History shows everything.
- Rename, recolor or delete a pinboard: right-click its tab.
- Unpin a clip: open its pinboard, select it and press ⌫.
Preview and edit
Select a clip and press Space to see all of it in a large preview above the panel. Press ← and → to flip to the previous or next clip, and Space again to close it.

- Details: the side panel shows the app the clip came from, when you copied it, its pinboard, and its size, word and line counts, image format and more.
- Edit: for text, links and colors, click Edit to change the clip itself. Copy puts the clip on the clipboard, and ↩ still pastes it.
- Keywords: add words to find a clip by in search, in the side panel. They're only visible in the preview.
- Move and resize: drag the preview by its title bar or resize it from any edge. Every preview opens where you left it.
- Rename: press ⌘R to give a clip a name, like "Studio Address", shown in place of its type.
- Links: right-click a link clip and choose Open in Browser. Files can be shown with Reveal in Finder.
Select several clips
⌘-click clips to select more than one, or press ⌘A to select them all. Then press ↩ to paste them together, ⌘C to copy them, or right-click to pin or delete them all at once.

Settings
Open Settings from the menu bar icon, with ⌘, while KlipLoft is open, or by launching KlipLoft again from Spotlight.

- Launch KlipLoft at login
- Start KlipLoft when you log in, so it never misses a copy.
- Sync History and Pinboards
- Sync your history and pinboards across your Macs, iPhone and iPad.
- History capacity
- Keep clips for a day, a week, a month or forever. Pinned clips and pinboards are always kept.
- Clear History
- Clear the last 24 hours or all history. Pinned clips stay.
- Direct Paste
- Paste straight into the app you're in, without switching back to KlipLoft first. Optional: it needs Accessibility permission, which KlipLoft asks for only when you turn it on.
- Always Paste as Plain Text
- Strip fonts, colors and links from every paste.
- Other tabs
- Clips holds clip appearance and extras; Shortcuts lists every keyboard shortcut; Privacy controls what KlipLoft saves and screen sharing; Bonus adds optional features like the window switcher.
- Import from Paste
- Brings your history and pinboards over from the Paste app. Find it in the menu bar icon's menu.
Privacy
The Privacy tab controls what KlipLoft saves and who can see it.
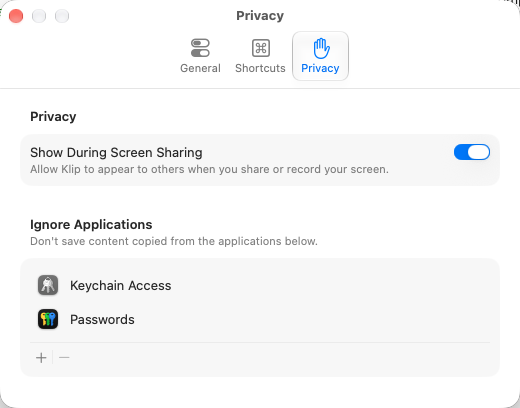
- Show During Screen Sharing
- On by default. Turn it off and KlipLoft's panel, previews and pop-up messages stay on your screen only, hidden from people watching a screen share and from screen recordings.
- Ignore Applications
- KlipLoft doesn't save anything you copy from these apps. Keychain Access and Passwords are on the list from the start, and ignoring Passwords also covers its menu bar popup. Click + to add an app, or select one and click − to remove it.
Keyboard shortcuts
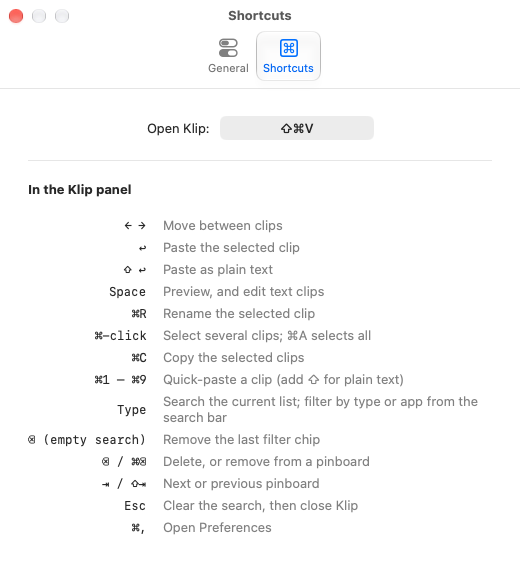
Everything in KlipLoft works from the keyboard. Open KlipLoft with ⇧⌘V, or any shortcut you like, and never reach for the mouse.
| ← → | Move between clips |
| ↩ | Paste the selected clip |
| ⇧ ↩ | Paste as plain text |
| Space | Preview, and edit text clips |
| ⌘R | Rename the selected clip |
| ⌘-click | Select several clips; ⌘A selects all |
| ⌘1 – ⌘9 | Quick-paste a clip (add ⇧ for plain text) |
| Type | Search; filter by type or app |
| ⌫ | Delete, or remove from a pinboard |
| ⇥ / ⇧⇥ | Next or previous pinboard |
| Esc | Clear the search, then close KlipLoft |
To change the shortcut that opens KlipLoft, click it in Settings → Shortcuts and press a new key combination.
iCloud sync
Turn on Sync clipboard history and pinboards in Settings, on every Mac signed in to the same Apple Account. Your history, pinboards, names and keywords stay the same everywhere, and anything you delete is deleted everywhere.
- Clips sync through your private iCloud database. Nobody else, including the developer, can see them.
- Images over 10 MB stay on the Mac that copied them.
- Your Macs share one history, so the history capacity setting applies to all of them.
- KlipLoft for iPhone and iPad shows the same history. See the iPhone & iPad help.
Permissions
KlipLoft needs no permissions. Out of the box it saves your clipboard, syncs with iCloud, and copies the clip you pick, so you press ⌘V yourself; a card at the top of the screen reminds you.
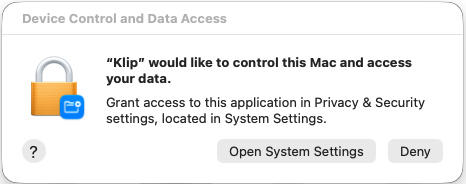
Want KlipLoft to paste for you? Turn on Direct Paste in KlipLoft Settings → General. Only then does macOS ask whether KlipLoft may “control this Mac and access your data.” That’s macOS’s standard wording for the access every clipboard manager needs to paste for you, and it sounds bigger than what KlipLoft does with it:
- What KlipLoft uses it for: pressing ⌘V for you, so the clip you pick goes straight into the app you were using. And, only if you turn them on in Settings → Bonus, the three-finger middle click and the window switcher.
- What KlipLoft never does: read your screen, record your keystrokes, or send anything anywhere. Your clips stay on your Mac and in your own iCloud.
- Your choice: KlipLoft never asks unless you turn on one of these features, and you can turn it off again at any time.
Turn it on
- In KlipLoft Settings → General, turn on Direct Paste.
- macOS shows the prompt below. Click Open System Settings. If you closed it, click Open Accessibility Settings… under Direct Paste.
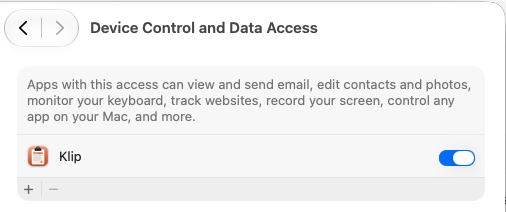
- In Privacy & Security → Device Control and Data Access, turn on KlipLoft.
- Back in KlipLoft Settings, Direct Paste’s status shows Active in green.
Turn it off, or leave it off
Leave Direct Paste off (the default), click Deny on the prompt, or turn KlipLoft off in System Settings → Privacy & Security → Device Control and Data Access. You can turn Direct Paste on again anytime in KlipLoft Settings → General.
Without this permission, KlipLoft still saves your clipboard, syncs with iCloud, and everything else in this guide works as usual. What changes is pasting from KlipLoft into another app:
- Pressing ↩, double-clicking a clip, or using quick-paste (⌘1–⌘9) puts the clip on the clipboard and closes KlipLoft. KlipLoft does not press ⌘V for you—press ⌘V yourself in the app you were using.
- A card at the top of the screen says “Press ⌘ V to paste.” To show just an icon, or nothing, choose under Paste Notice in KlipLoft Settings → General.
- ⌘C still copies the selected clip without pasting.
- Optional extras that use the same permission, such as three-finger middle click and the window switcher in Settings → Bonus, stay off until you allow access again.
See the Privacy Policy for details.
Requires iOS 26 or later on iPhone, or iPadOS 26 or later on iPad
Get started
KlipLoft for iPhone and iPad keeps a history of the clips you save: text, links, images, files and colors. It works on its own, and with KlipLoft for Mac everything you copy on your Mac shows up here too, through your own iCloud.
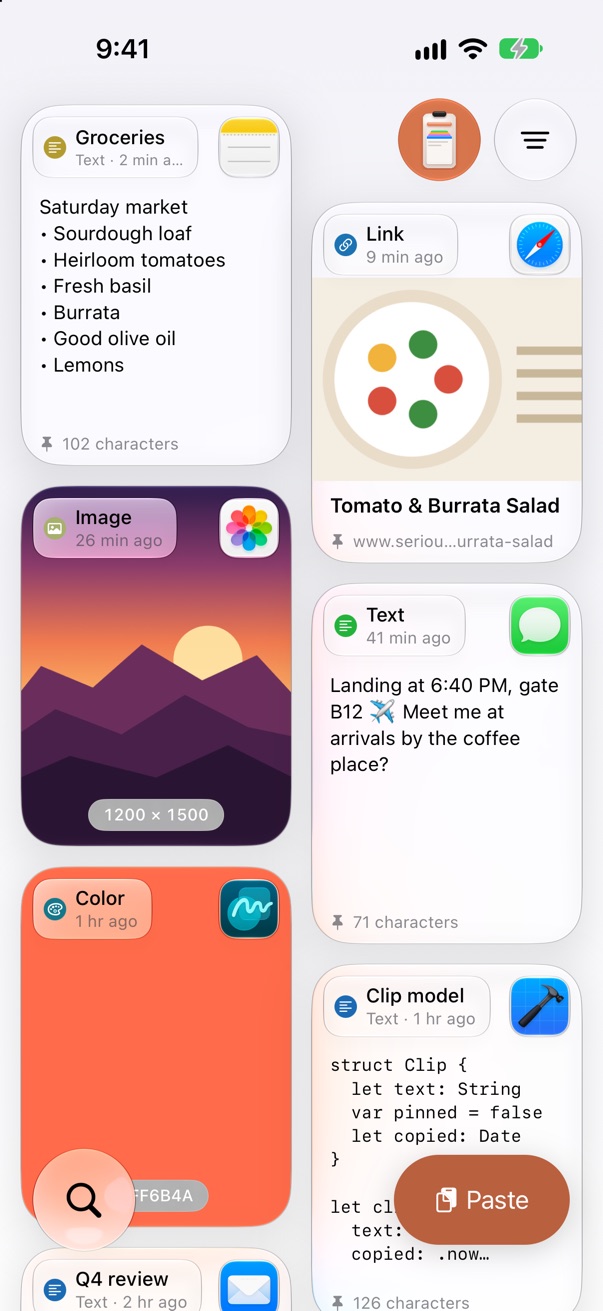
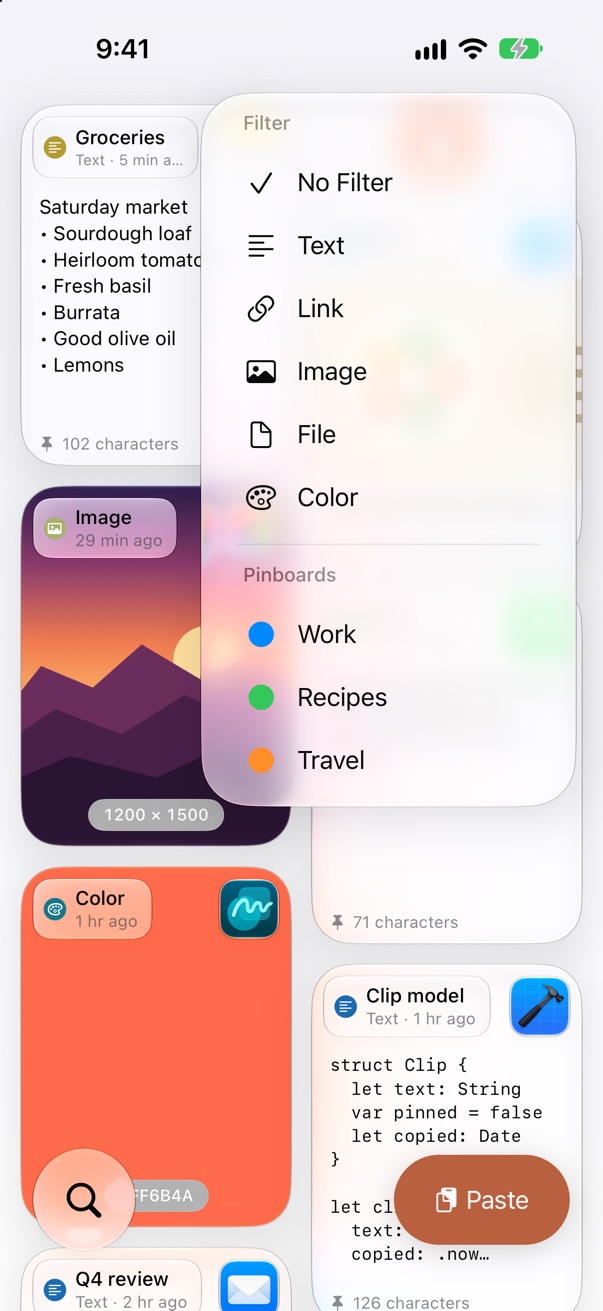
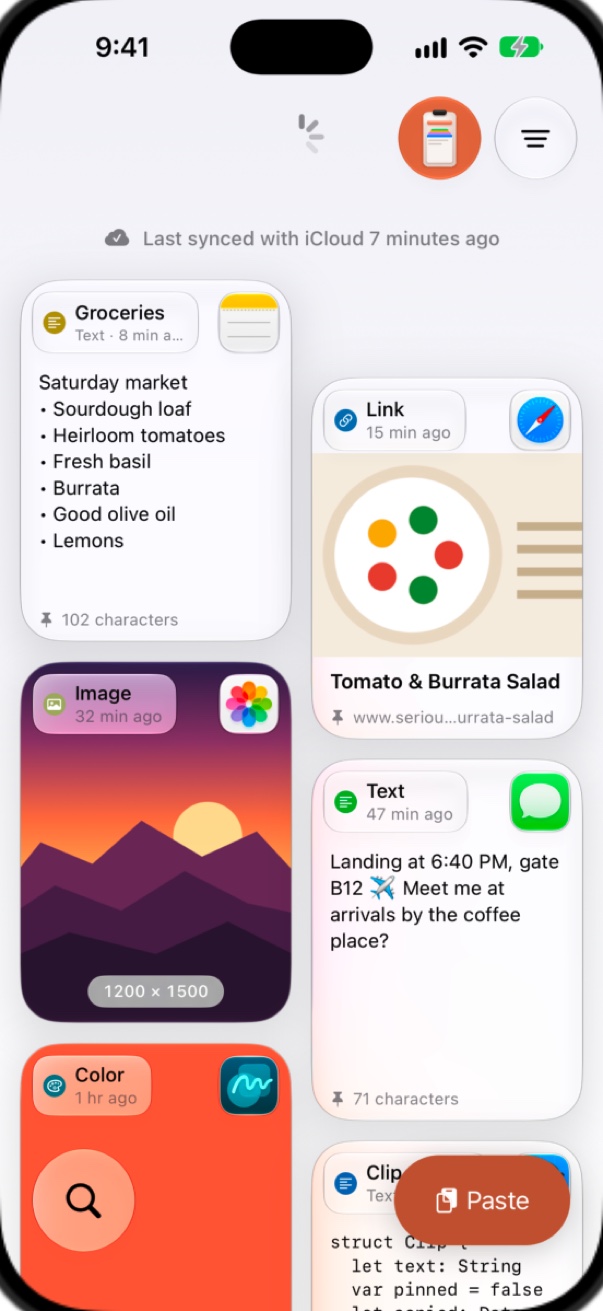
Your clips are shown as cards, newest first. The buttons float over them: the KlipLoft button and the filter at the top right, search at the bottom left and paste at the bottom right.
KlipLoft works the same way on iPad, with more cards on the larger screen. Everything in this guide applies to both.
Copy a clip
Tap a card to copy it, then paste it in any app. Copying a clip moves it back to the front of your history.
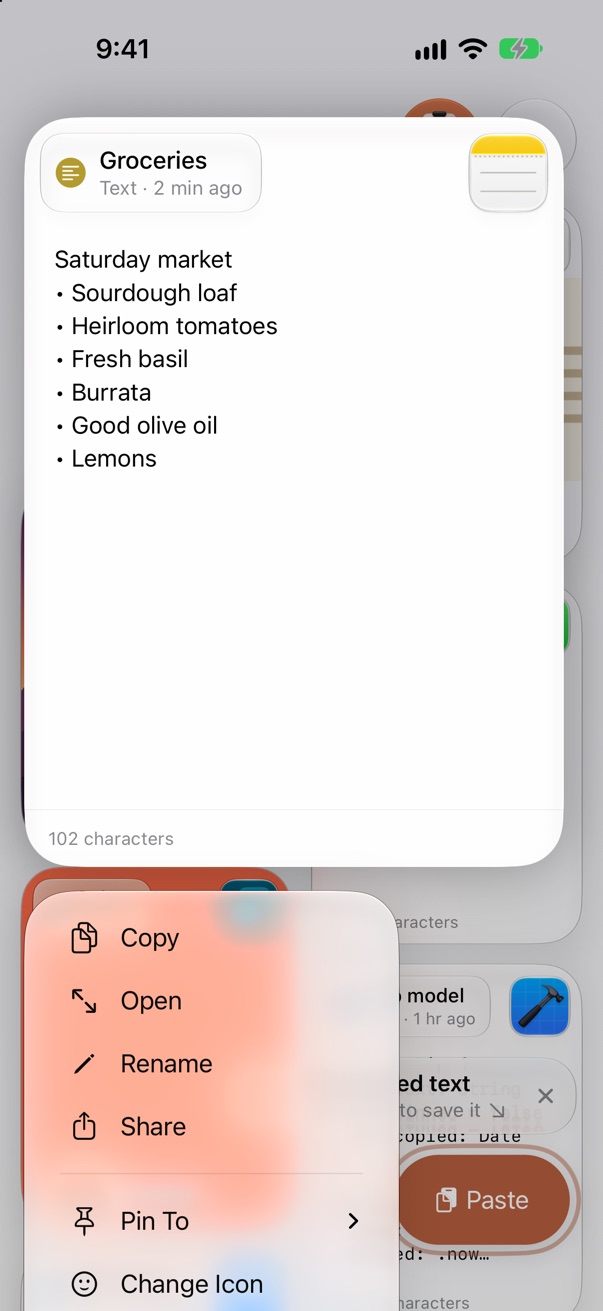
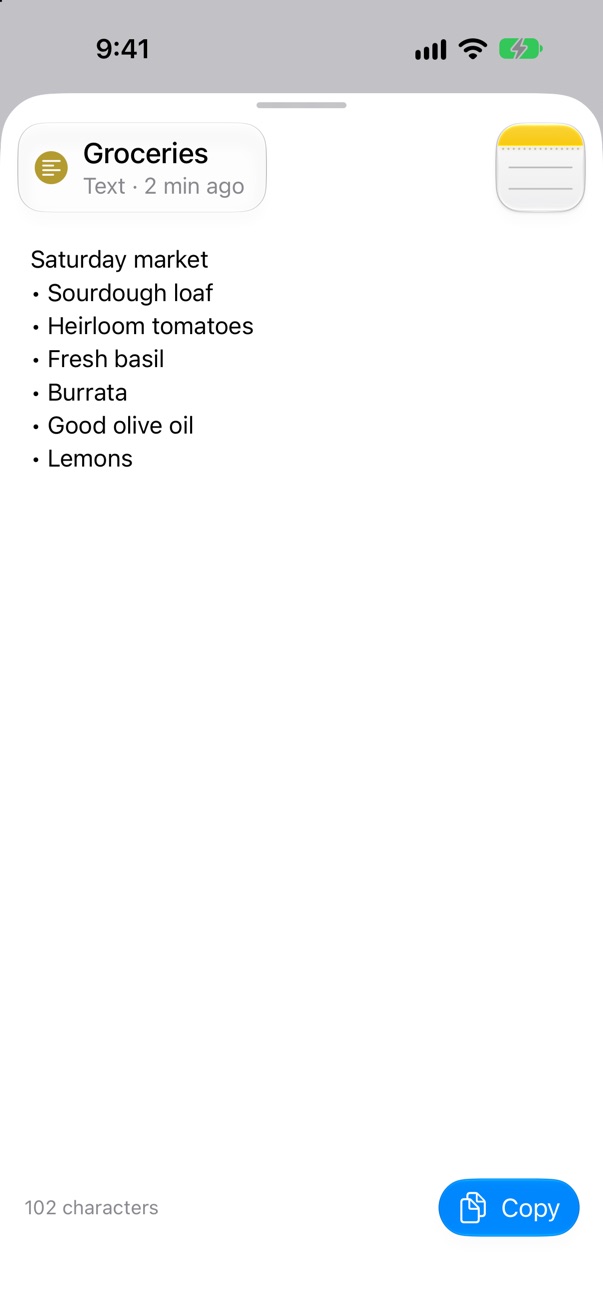
Touch and hold a card to see it larger, with a menu of everything you can do with it:
- Copy, or Copy as Plain Text for rich text.
- Open to read the whole clip and select part of it.
- Rename to give it a name, like "Studio Address", shown in place of its type.
- Open in Safari for links, and Share.
- Pin To or Unpin, and Delete.
Save from the clipboard
Copy something in any app, open KlipLoft and tap Paste at the bottom right. KlipLoft saves what's on the clipboard (text, a link, a color or an image) as a new clip, and it shows up on your other devices too.
Why a button? KlipLoft reads your clipboard only when you tap it. It never looks at what you copy in the background.
Images larger than 10 MB are saved on this device but don't sync.
Search and filter
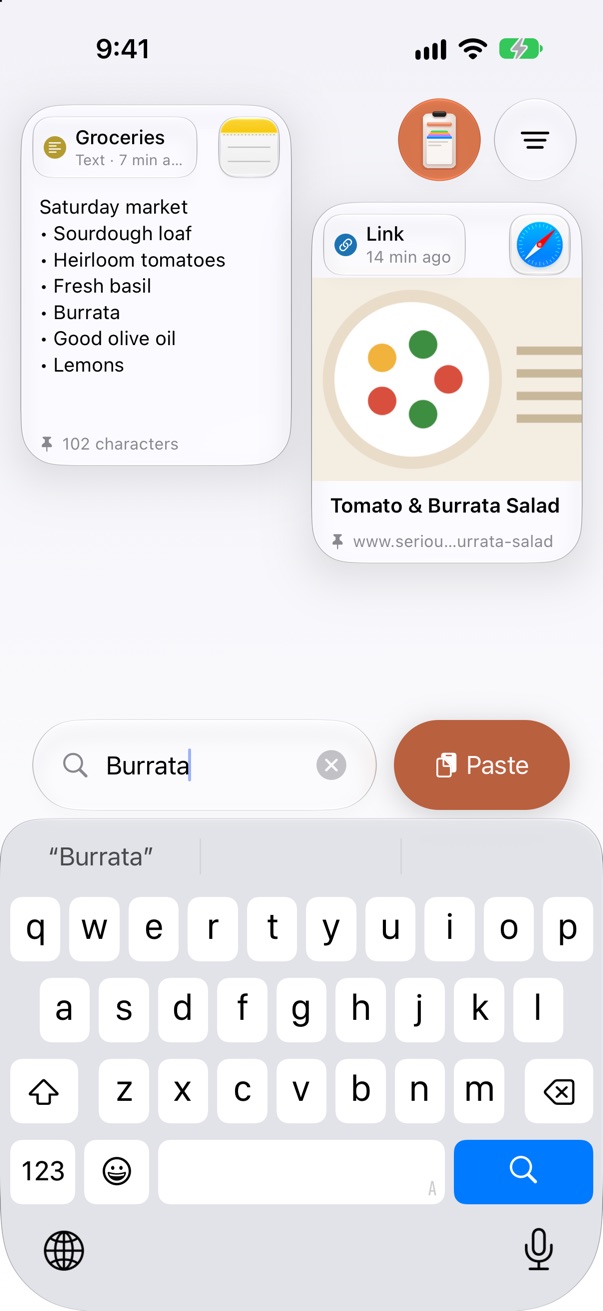
Tap the magnifying glass at the bottom left and type. KlipLoft searches the text of your clips, their names, link titles, keywords and the apps they came from.
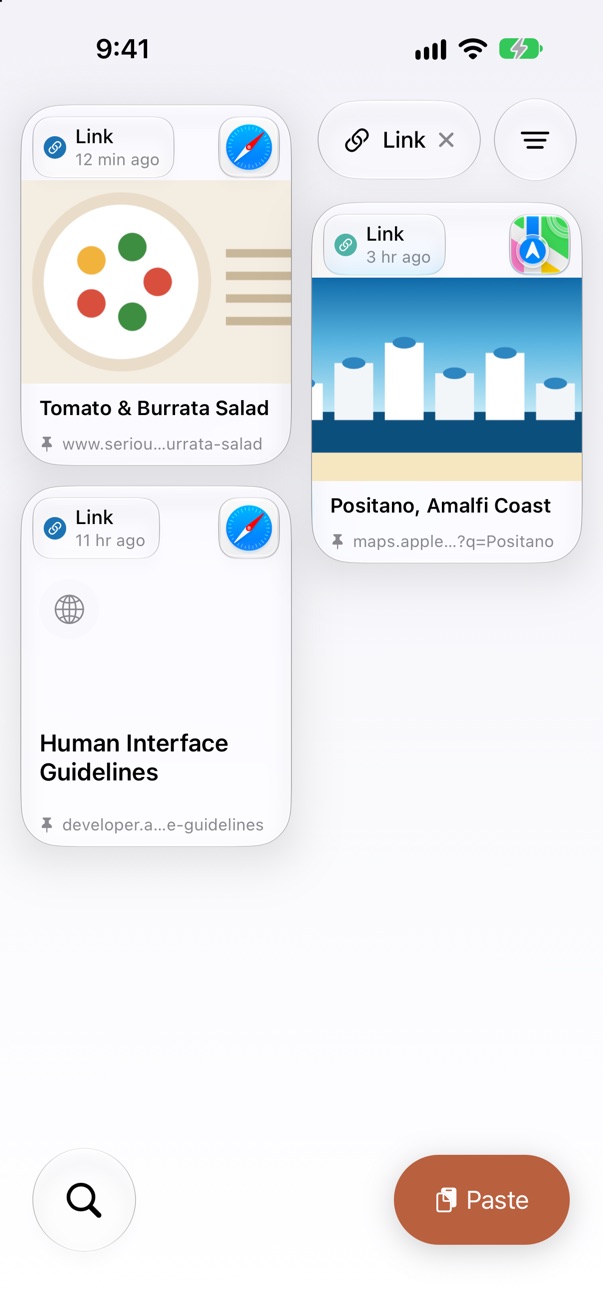
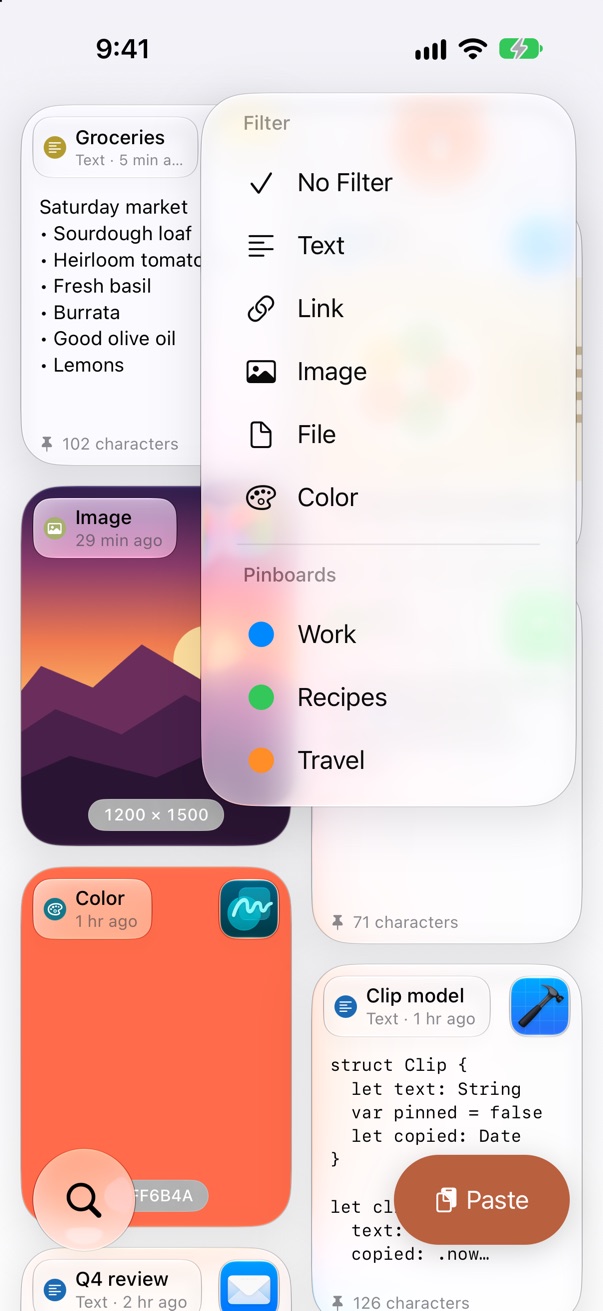
Tap the filter button at the top right to show one clip type (Text, Link, Image, File or Color) or one pinboard. You can use a type and a pinboard together, for example only the links on your Work pinboard. Each filter shows as a chip at the top; tap it to clear it.
Pinboards
Pinboards keep the clips you use often. Pinned clips are never removed from your history, and your Mac's pinboards are all here.
- Pin a clip: touch and hold it and choose Pin To.
- Show a pinboard: choose it from the filter button.
- Create and manage pinboards: open Settings → Pinboards. Tap + to add one, tap a pinboard to rename it, or tap its dot to change its color. Tap Edit, or touch and hold and drag, to reorder.
- Share a pinboard: in Settings → Pinboards, swipe left on it and tap Share. KlipLoft sends it as a file that someone with KlipLoft can open to import it.
- Import a shared pinboard: tap the
.klipfile in Messages, Mail or Files and open it in KlipLoft. KlipLoft asks to import it; tap Import and the pinboard opens. If you already have a pinboard with the same name, its clips are added to it. - Delete a pinboard: swipe left on it and tap Delete. Its clips stay in your history.
Turn on the KlipLoft keyboard
Add KlipLoft as a keyboard once, and your clips are a tap away in every app. It takes about a minute, and the steps are the same on iPhone and iPad. Follow the orange ring on each screen.
-
Open Settings
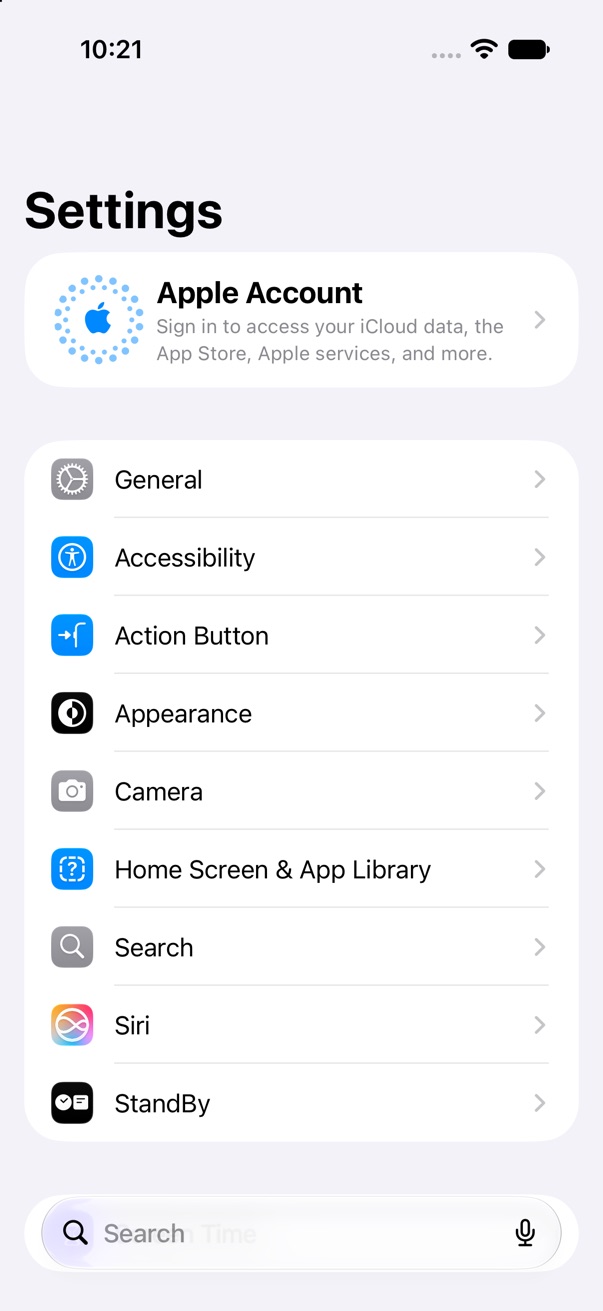
Open the Settings app and tap General.
-
Keyboard
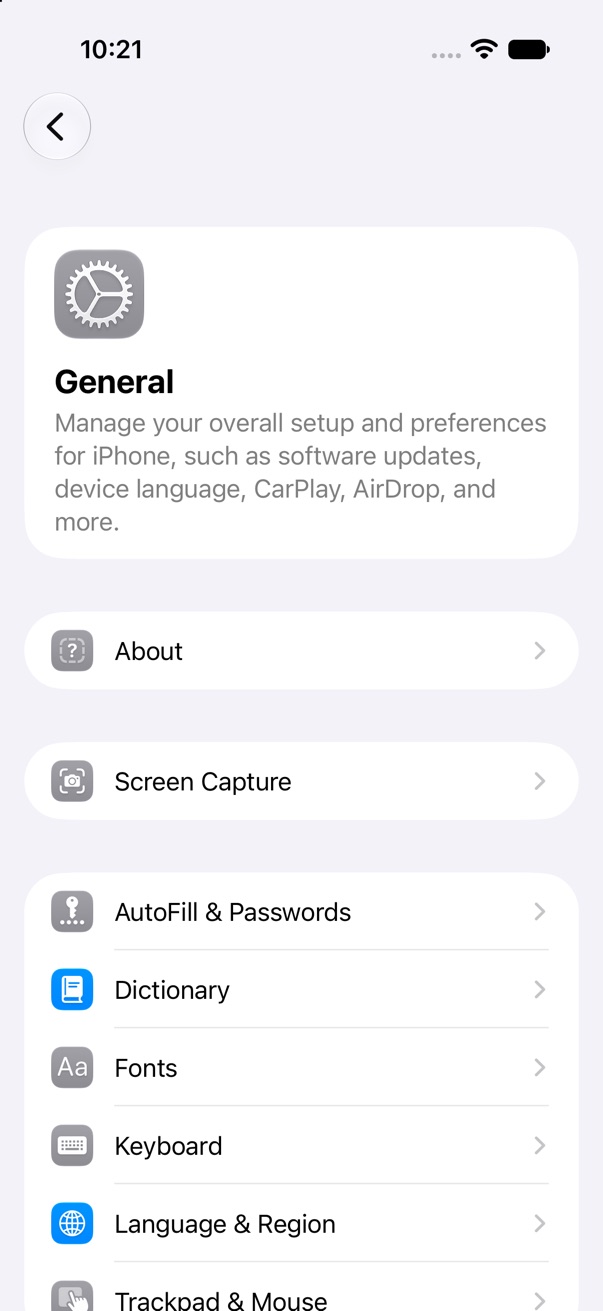
Scroll down a little and tap Keyboard.
-
Keyboards
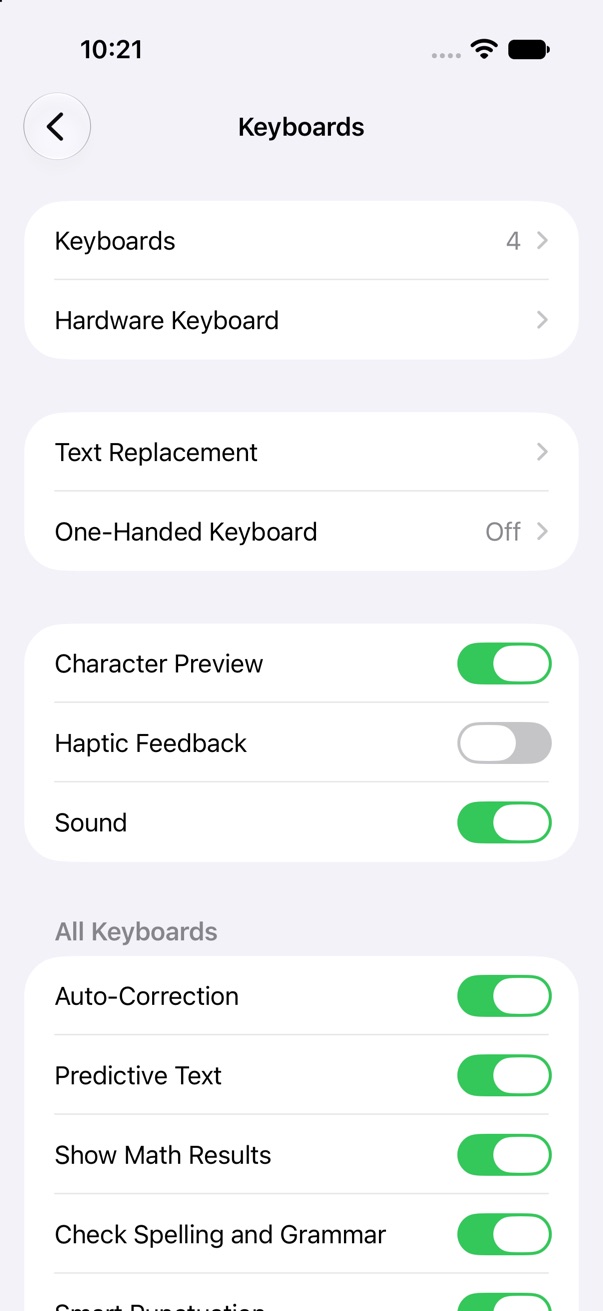
Tap Keyboards at the top. The number is how many you have now.
-
Add New Keyboard
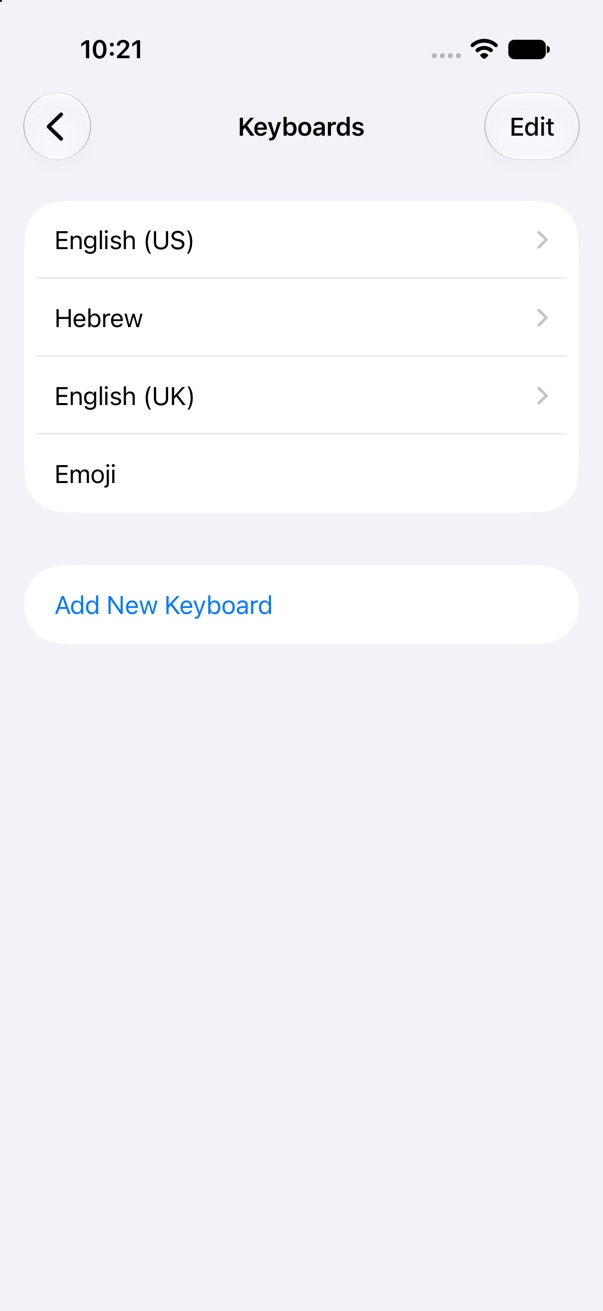
Below your keyboards, tap Add New Keyboard.
-
Choose KlipLoft
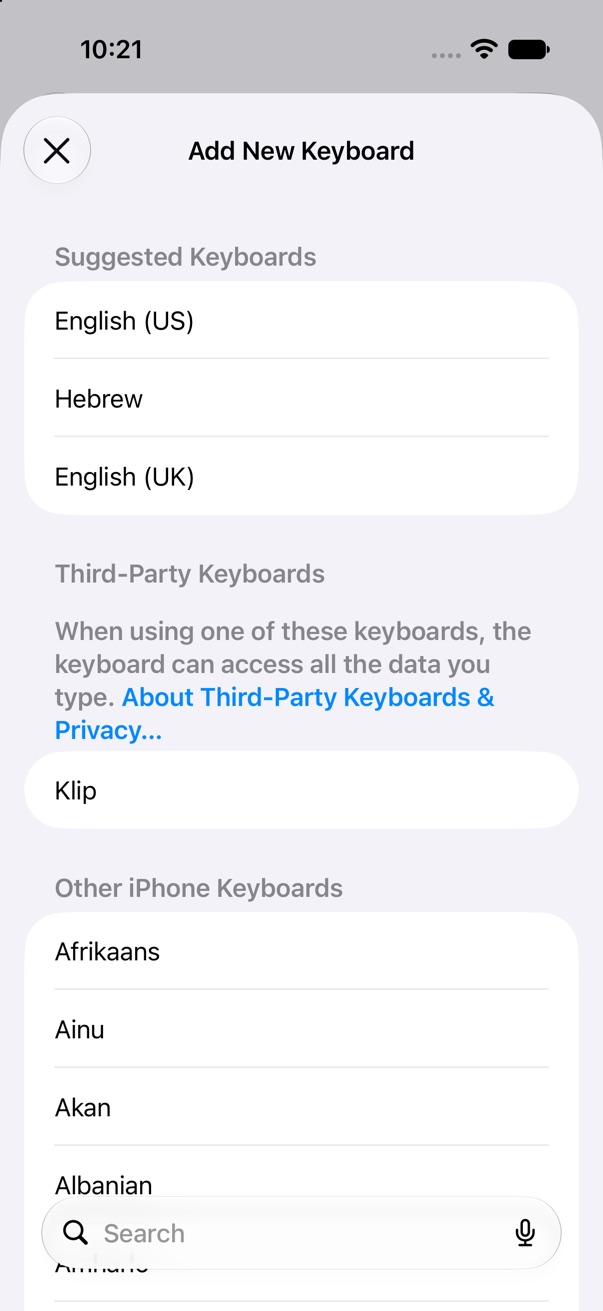
Under Third-Party Keyboards, tap KlipLoft. It joins your list of keyboards.
-
Allow Full Access
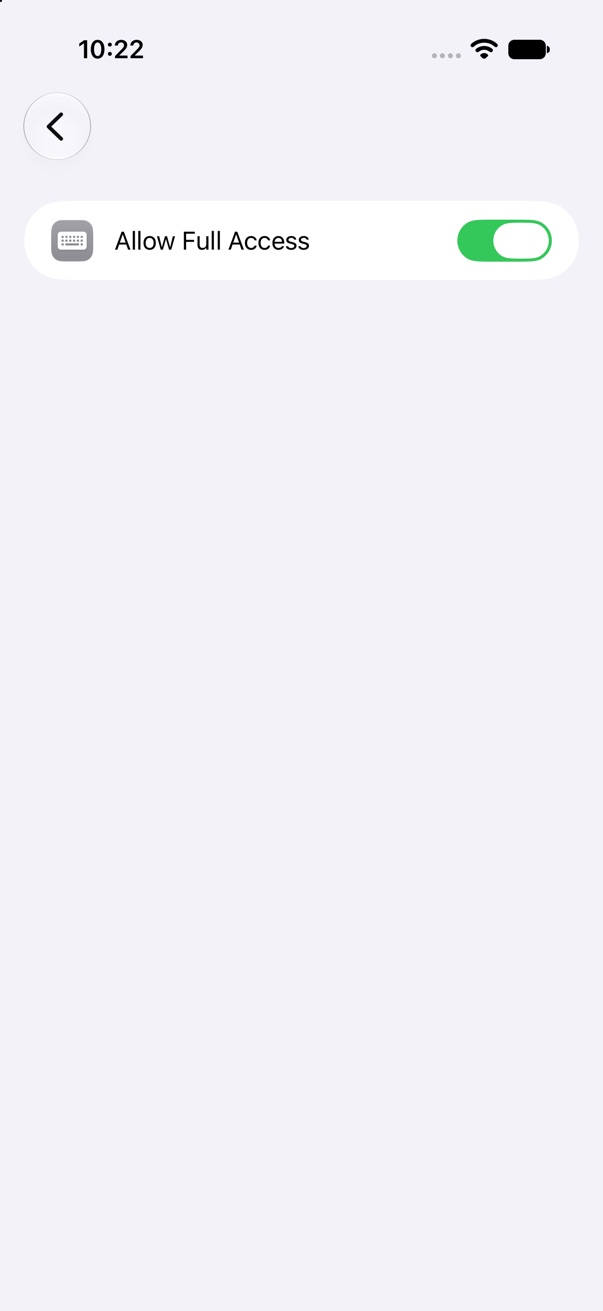
Tap KlipLoft in your keyboards, then turn on Allow Full Access.
-
Tap Allow
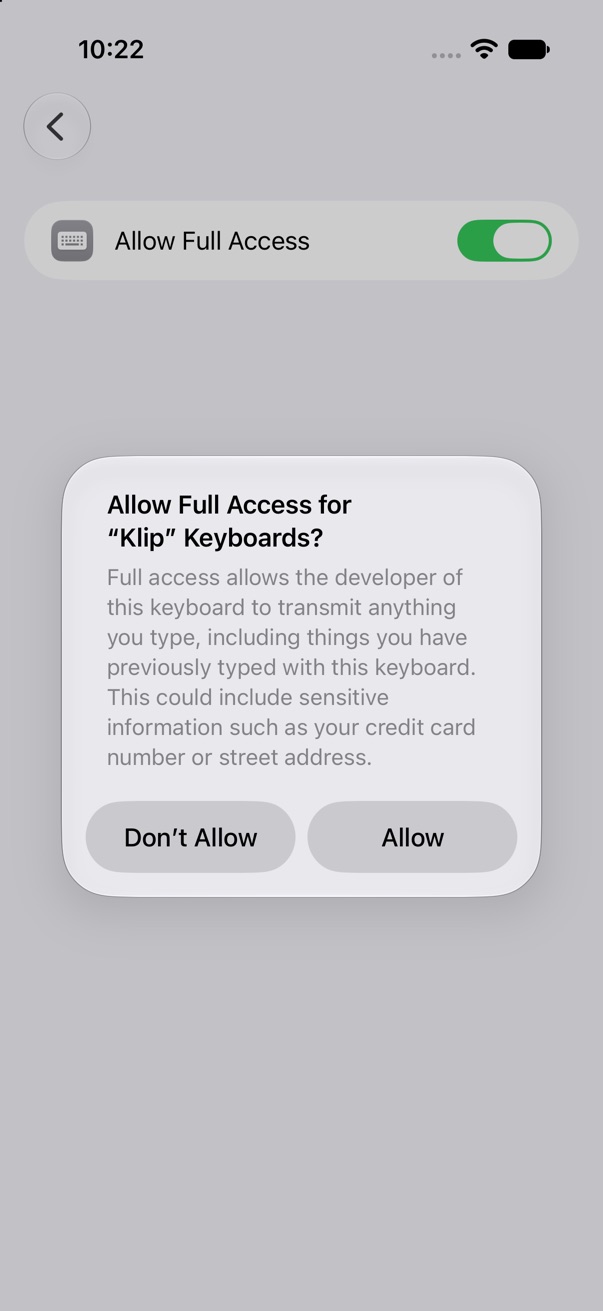
iOS shows the same warning for every keyboard. Tap Allow. Why KlipLoft asks
-
Switch to KlipLoft
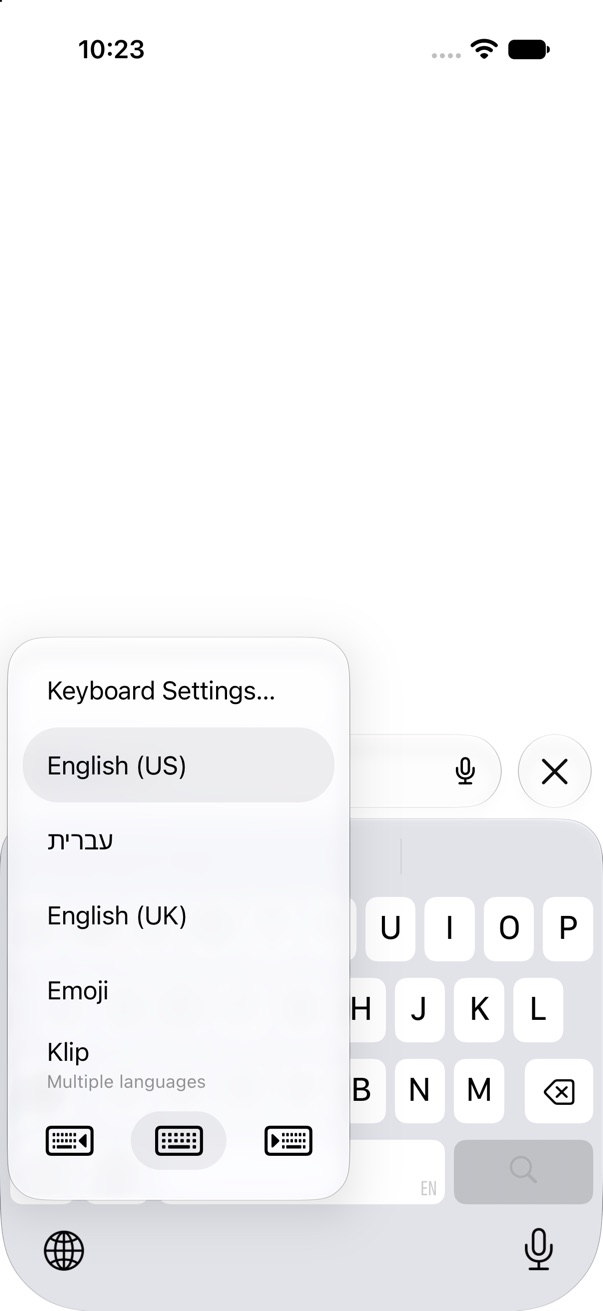
In any app, touch and hold the globe key 🌐 and choose KlipLoft. You're all set.
Shortcut. In KlipLoft, tap the KlipLoft button at the top right, then Open Settings under Keyboard. It opens KlipLoft's page in the Settings app: tap Keyboards, then turn on KlipLoft and Allow Full Access.
KlipLoft keyboard
The KlipLoft keyboard puts your clips in any app, so you can paste them without opening KlipLoft. It's optional: iOS only lets you add a keyboard yourself, so it takes a minute to set up the first time.
1. Check it's on in KlipLoft
In KlipLoft, tap the KlipLoft button at the top right to open Settings. Under Keyboard, KlipLoft Keyboard is on unless you turned it off. While it's on, Settings lists the steps below and an Open Settings button.
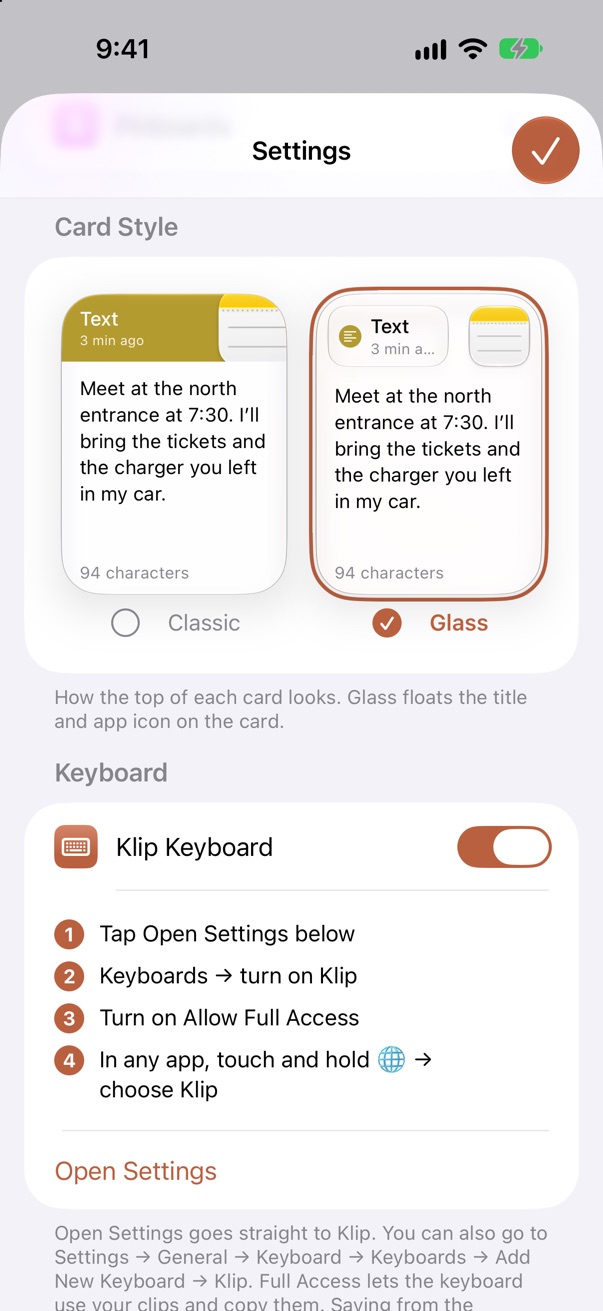
2. Add KlipLoft in iOS Settings
Tap Open Settings. It goes straight to KlipLoft's page in the iOS Settings app.
- Tap Keyboards.
- Turn on KlipLoft.
- Turn on Allow Full Access, then tap Allow when iOS asks.
You can also get there yourself: open Settings, go to General → Keyboard → Keyboards → Add New Keyboard and choose KlipLoft. Then tap KlipLoft in your list of keyboards and turn on Allow Full Access. See each step with screenshots.
About Full Access
The keyboard needs Full Access to read the clips you've saved in KlipLoft and to copy clips for you to paste. iOS shows the same warning for every keyboard that asks for it, because a keyboard with letter keys could send what you type. The KlipLoft keyboard has no letter keys, doesn't record anything you type and never goes online. It reads your clipboard only when you tap Paste. See the Privacy Policy for details.
3. Switch to KlipLoft
In any app, tap a text field to bring up the keyboard. Touch and hold the globe key 🌐 and choose KlipLoft. Or tap the globe key until KlipLoft appears. On iPhones with Face ID, the globe key is below the keyboard, at the bottom left of the screen. iOS remembers your choice, so KlipLoft comes back the next time you open that keyboard.
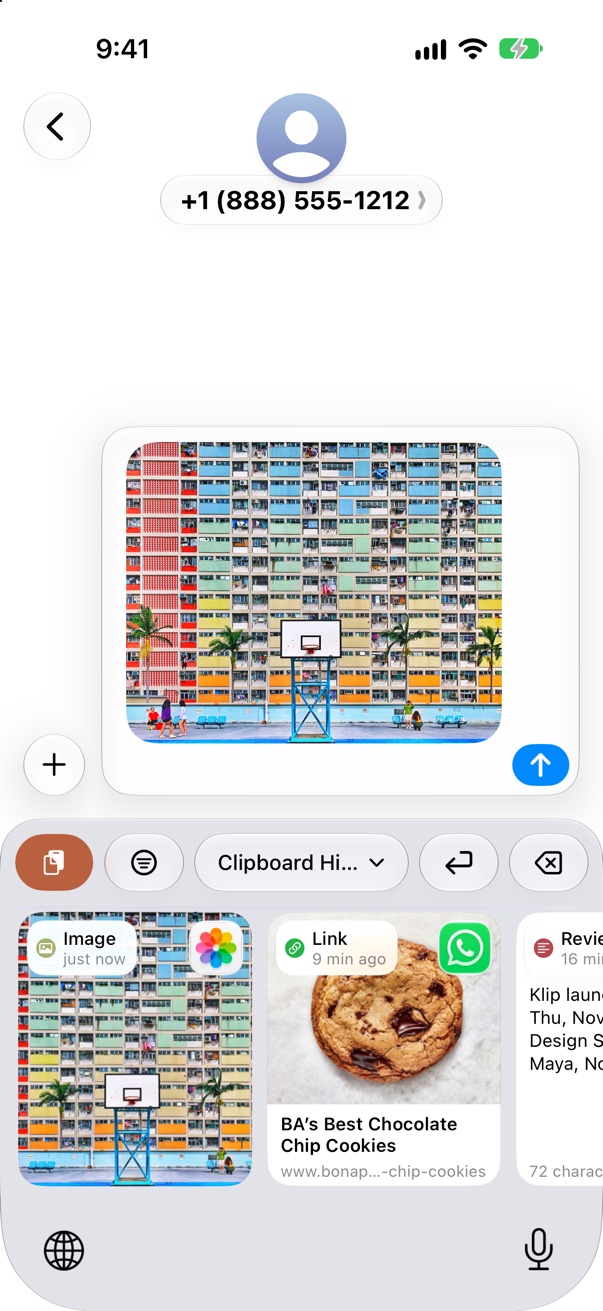
Use the keyboard
- Type a clip: tap a card and KlipLoft types it into the field you're in. Images can't be typed, so tapping one copies it for you to paste.
- Copy instead: touch and hold a card and choose Copy.
- Save from the clipboard: tap Paste. If a pinboard is shown, the clip is pinned to it. Very large photos need to be saved in the KlipLoft app instead.
- Pick what you see: the menu shows your whole Clipboard History or one pinboard.
- Filter: tap the filter button to show only one type of clip (Text, Link, Image and so on) or only clips from one app. Choose Clear Filters to see everything again.
- Delete text: tap the delete key ⌫ to delete the character before the cursor, or hold it to keep deleting. You can fix a mistake without switching keyboards.
- Open KlipLoft: tap the KlipLoft button. Use the globe key to switch back to your usual keyboard.
If the keyboard shows a message
- KlipLoft Keyboard is off
- Turn on KlipLoft Keyboard in KlipLoft's Settings, then switch back to the keyboard.
- Allow Full Access
- Full Access is off. Go to Settings → General → Keyboard → Keyboards → KlipLoft and turn on Allow Full Access.
- Couldn't load clips
- Open the KlipLoft app once, then switch back to the keyboard. If it keeps happening, delete and reinstall KlipLoft.
You're never stuck on KlipLoft: use the globe key below the keyboard, or on iPhones without Face ID, the Next Keyboard button in the message.
Remove the keyboard
Go to Settings → General → Keyboard → Keyboards, tap Edit and remove KlipLoft. Your clips stay in the KlipLoft app.
iPhone Duo
Folded, KlipLoft on iPhone Duo works like it does on any iPhone, with its buttons in a column beside your clips so the cards keep the screen. Open it, and your clips sit on the left with the full clip on the right: tap a card to copy it and see all of it.
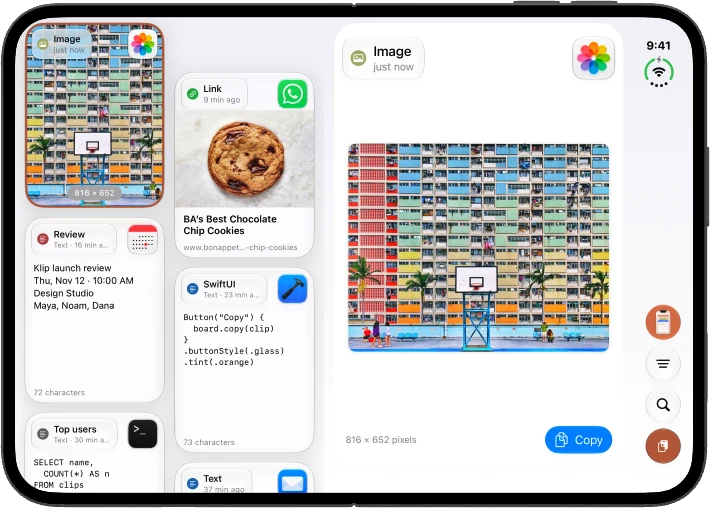
The KlipLoft keyboard fits both displays and shows wider cards when iPhone Duo is open.
Settings
Tap the KlipLoft button at the top right. It steps aside while a filter is on; clear the filter to see it again.
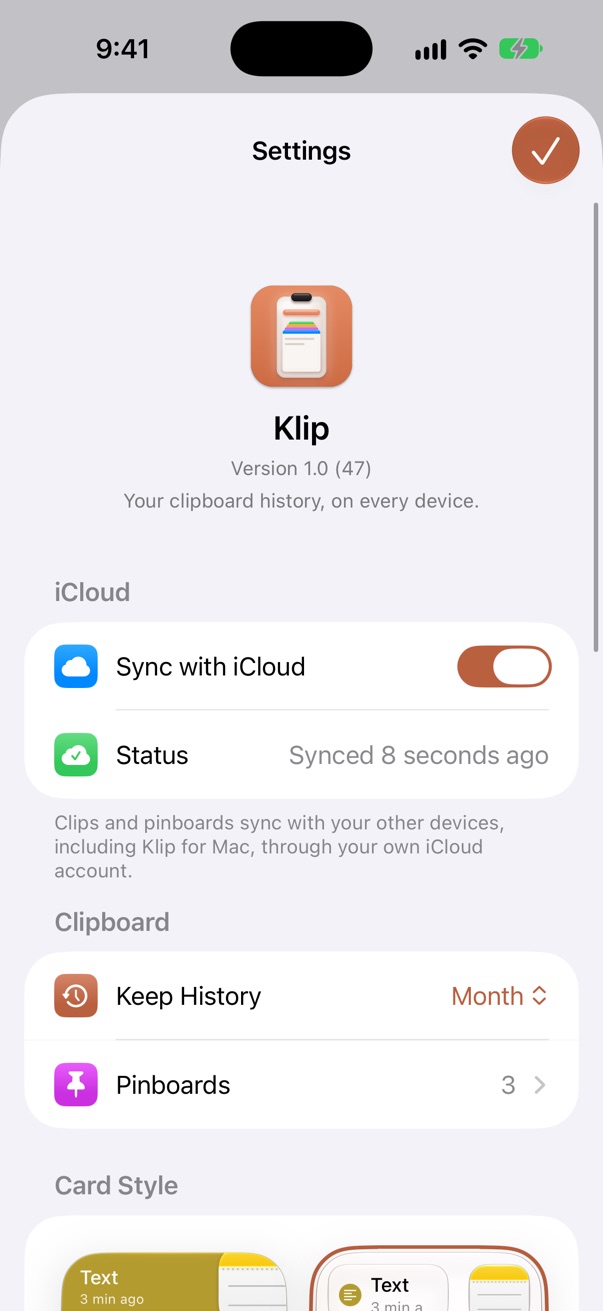
- Sync with iCloud
- Sync your clips and pinboards with your other devices. Status shows whether sync is working. Close and reopen KlipLoft after turning it on or off.
- Keep History
- Keep clips for a day, a week, a month, or with no limit. Pinned clips are always kept. Choosing a shorter time asks first, then deletes unpinned clips older than that, on all your devices if sync is on.
- Pinboards
- Create, rename, recolor, reorder, share and delete pinboards.
- Card Style
- Choose how the top of each card looks: Classic, or Glass, which floats the title and app icon on the card.
- KlipLoft Keyboard
- Turn the keyboard on, with the steps to add it in iOS Settings.
- Clear History
- Removes every clip that isn't pinned. With sync on, they're removed from all your devices. Pinboards are kept.
- About
- Get KlipLoft for Mac, rate KlipLoft, and open this Help, Support or the Privacy Policy.
iCloud sync
Sync is on by default. Sign in to the same Apple Account on your Mac, iPhone and iPad, and turn on sync in KlipLoft for Mac too. Your clips, pinboards, names and keywords then stay the same everywhere.
- Pull down on your clips to check for changes and see when KlipLoft last synced.
- Clips sync through your private iCloud database. Nobody else, including the developer, can see them.
- With sync off, your history stays only on this device.
See the Privacy Policy for details. Clips not showing up? See Support for common sync problems and fixes.
Still stuck?
Common problems and fixes are on the Support page.